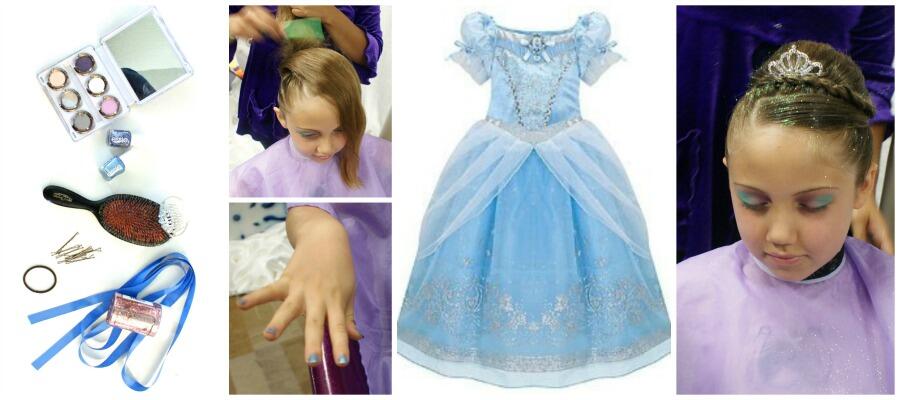
One of the most epic cinematic transformations has got to be the amazing makeover in the Disney classic Cinderella. The animated moment when the frazzled soon-to-be princess goes from rags to ravishing, is breathtaking. Now, it’s being replicated in Disney’s new live-action version of the tale, which features Helena Bonham Carter as the Fairy Godmother and Lily James as Cinderella. And it sucks us in every time: who wouldn’t want a Fairy Godmother to give you a fabulous new look?
Disneyland and Disneyworld parks tap into this desire for princesses of all ages with the makeovers offered at their always hopping Bibbidi Bobbidi Boutique. There, a personally assigned Fairy Godmother-in-training performs their mortal magic on each princess-loving client. It’s a special experience, but not everyone has the time or money to travel to Orlando or Anaheim to get this exclusive treatment. So here’s how you can perform your own DIY princess transformation in the comfort of your own home:
What You Need:
The Set
Chair
Sheets, a table cloth, or large piece of fabric
Ribbons
Beauty Supplies
Nail polish
Light eye shadows
Brush
Hair gel
Hair Band
Bobby pins
Ribbon and or tiara
Large piece of Fabric or a Robe
Final Touch:
Glitter
A Princess Costume
Step 1: Set the stage.
Create a make-shift “salon” using items found around the house. But don’t let your child see you putting it together, make it a surprise! Hang sheets or tablecloths from a wall to create a curtain effect, and secure them with colorful ribbons. If you want to kick up the fancy, add inexpensive fabric (perhaps a few yards of silver lame or inexpensive brocade?) to give it an extra wow factor. Since this is a royal makeover, you need a throne. Take a dining room chair and cover it with a table cloth or a bedspread. Secure it to the chair with a big ribbon for a bit of flair.
Step 2: Get into Character
You can’t really fill the role of a fairy godmother capable of makeover magic while wearing sweats and a t-shirt. Dress up a bit and maybe put a flower in your hair, plus a little makeup. You can always take it a step further and give yourself a new name and perhaps even speak with an accent.
Step 3: Assemble the Supplies
You don’t want to have to pause this particular flight of fantasy to grab a comb or nail polish. Gather everything you need and keep it close at hand. Choose an age appropriate hue of nail polish (for Cinderella, a light blue would be lovely), a few light eye shadows, a hair brush, hair gel (the folks at Bibbidi Bobbidi Boutique use a product called Let’s Jam that’s available at most beauty supply outlets), a hair brush, hair bands, bobby pins and any accessories you might want to add, like ribbon or a tiara.
Step 4: The Hair
First, lay a large piece of fabric over their torso, or have them wear a robe to really give that, “I’m at a salon” feeling. As for the makeover itself, it’s best to start with the hair. There are so many options for hair-dos. You could go classic like with an old-school Cinderella top bun or you could try to achieve something a bit more complex like Princess Anna’s braids. If you need help with these hairstyles, check out Cute Girls Hairstyle and Princess Hairstyles. Both have easy to follow step-by-step instructions.
Step 5: The Make-Up and Nails
Since you are (presumably) performing this makeover on a child, you’ll want to keep the makeup and nail polish subtle (so put away that hot red polish and the black liquid eyeliner). Opt for eye shadows in hues of light pink, baby blue or frosty white and for the nails, light pink or a Cinderella blue are tasteful choices.
Step 6: The Final Touches
And finally, have them put on a princess costume. The absolute best is to leave that as a surprise, presenting them with a new (or new to them) costume to put on. While you could order a brand new costume online, you can often get great deals on used princess dresses from eBay, your local thrift store or children’s resale shop. After they have their gown on, their hair perfected, and their nails painted, you can add that extra bit of magic. At Disneyland the Fairy Godmother-in-training sprinkles pixie dust onto the child, you can do that as well with a bit of glitter from the craft store (just don’t sprinkle too much, because odds are, you’re the one that’s going to have to pick it up).
Step 7: Presenting the Princess
Now it’s time for the grand “reveal.” Lead your little princess to a mirror and show her the transformation. Make sure to have your camera ready, her smile is a moment you’ll want to have forever.
Sunny Chanel is a regular contributor to Fandango Family, Babble.com, Mom.me, Disney Imagicademy and Mommy Nearest as well as her own whimsical site Wonder and Company. When she isn't writing, watching movies or doing crafts, she is playing dress up with her 8-year-old daughter.
